On this page
How many of your new remote hires are technically onboarded by lunch on day one but cannot complete a single piece of real work?
The laptop arrives with a working email account and Slack access set up even before they start the day. But when they login there’s nothing.
They cannot access project workspaces on the laptop. Moreover, the customer records aren’t available, and there’s no invite to the channels where you can assign them to tasks. Despite having the tools, they won’t be able to start work, delaying the whole cycle for you.
You didn’t miss a step here. The employee software onboarding checklist you had drawn measured against a different finish line.
Most onboarding processes stop tracking the moment an employee’s account is created. They do not track the time they use these channels to actually perform their job.
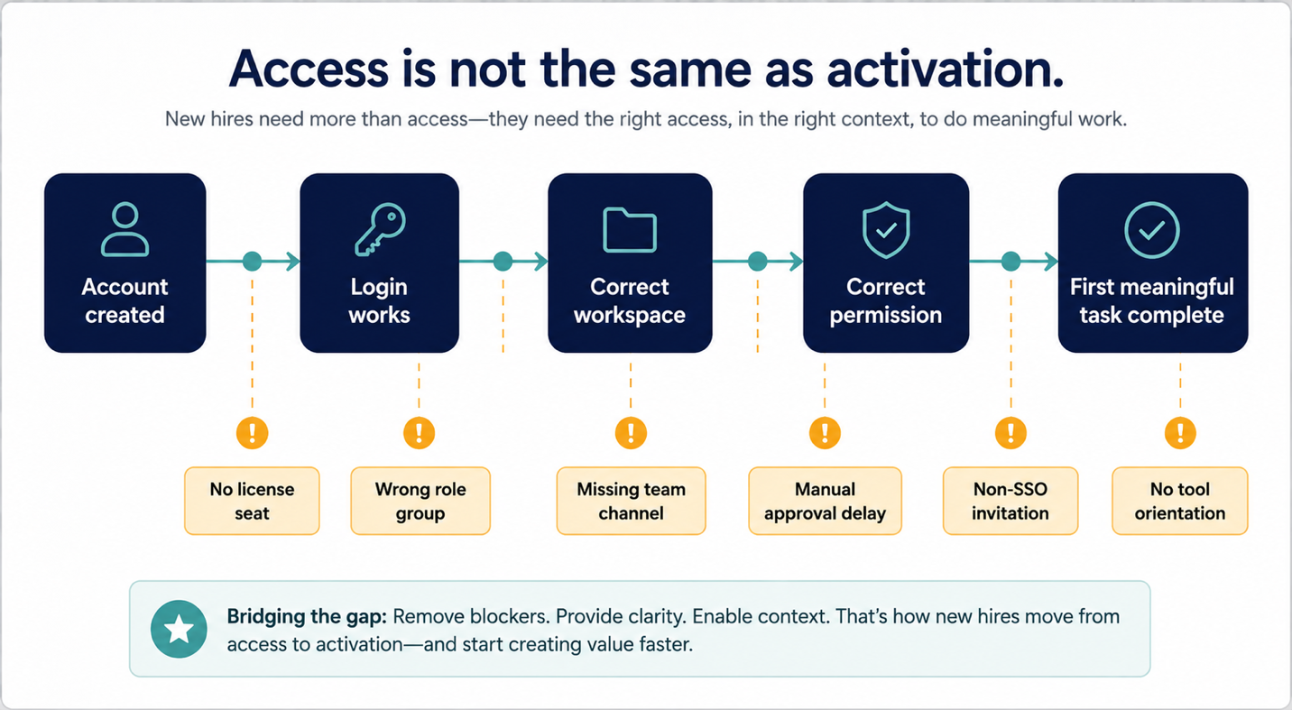
The distance between a new hire’s first login and the first completed task is called time to productive access.
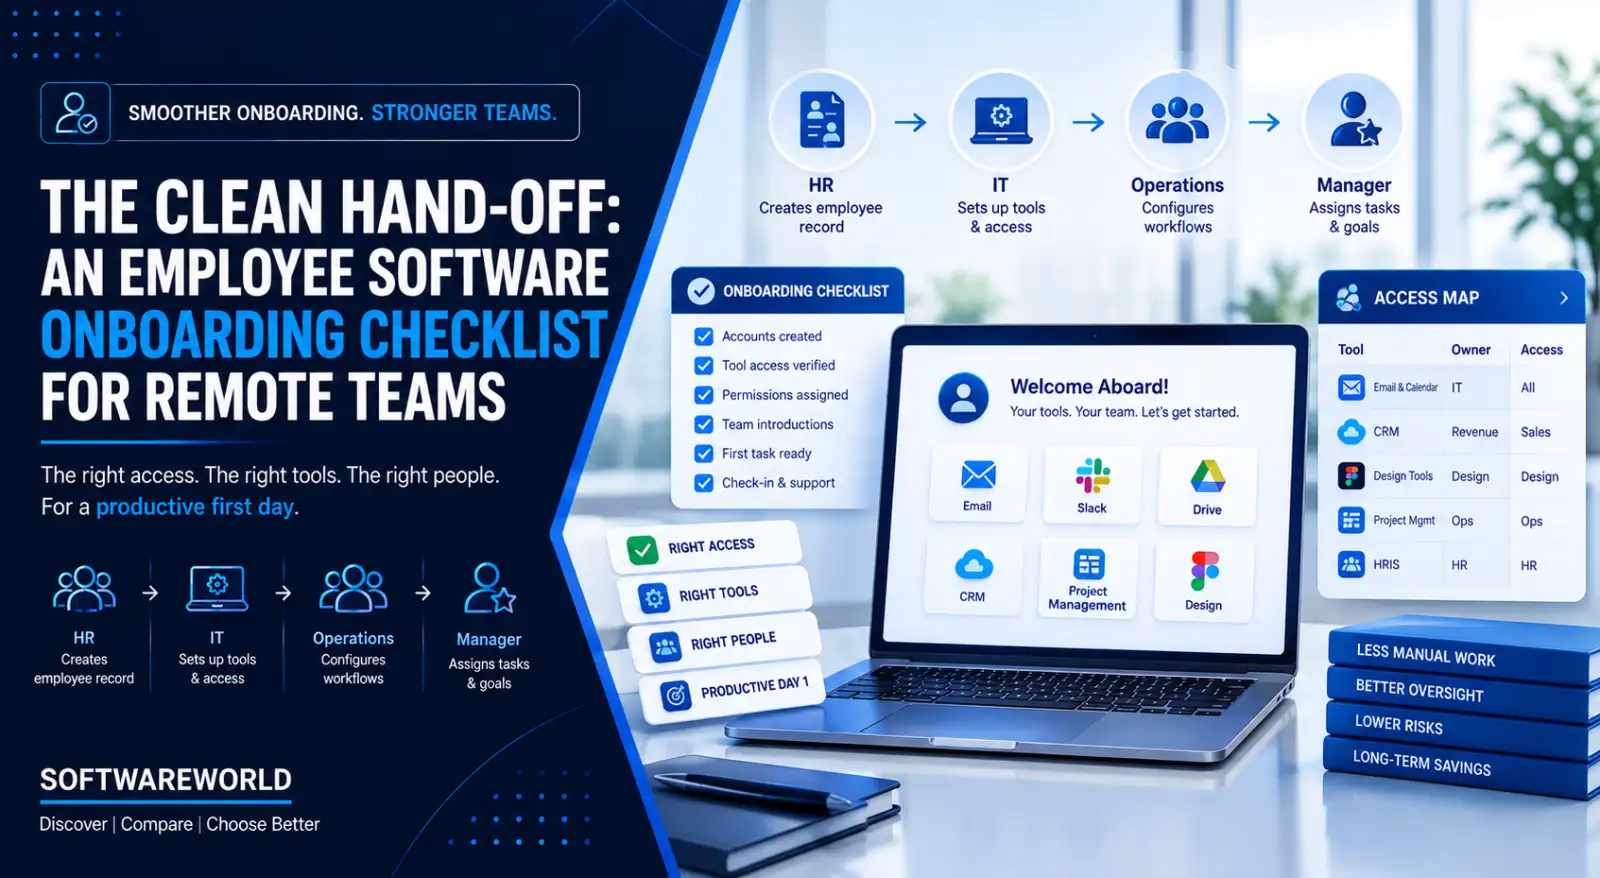
This guide helps you close this gap. Learn how to create a repeatable hand-off between HR, Operations, IT, and the hiring manager to guarantee a productive first day for your new hire.
› Why Access Breaks: The Hidden Cost of Too Many Tools
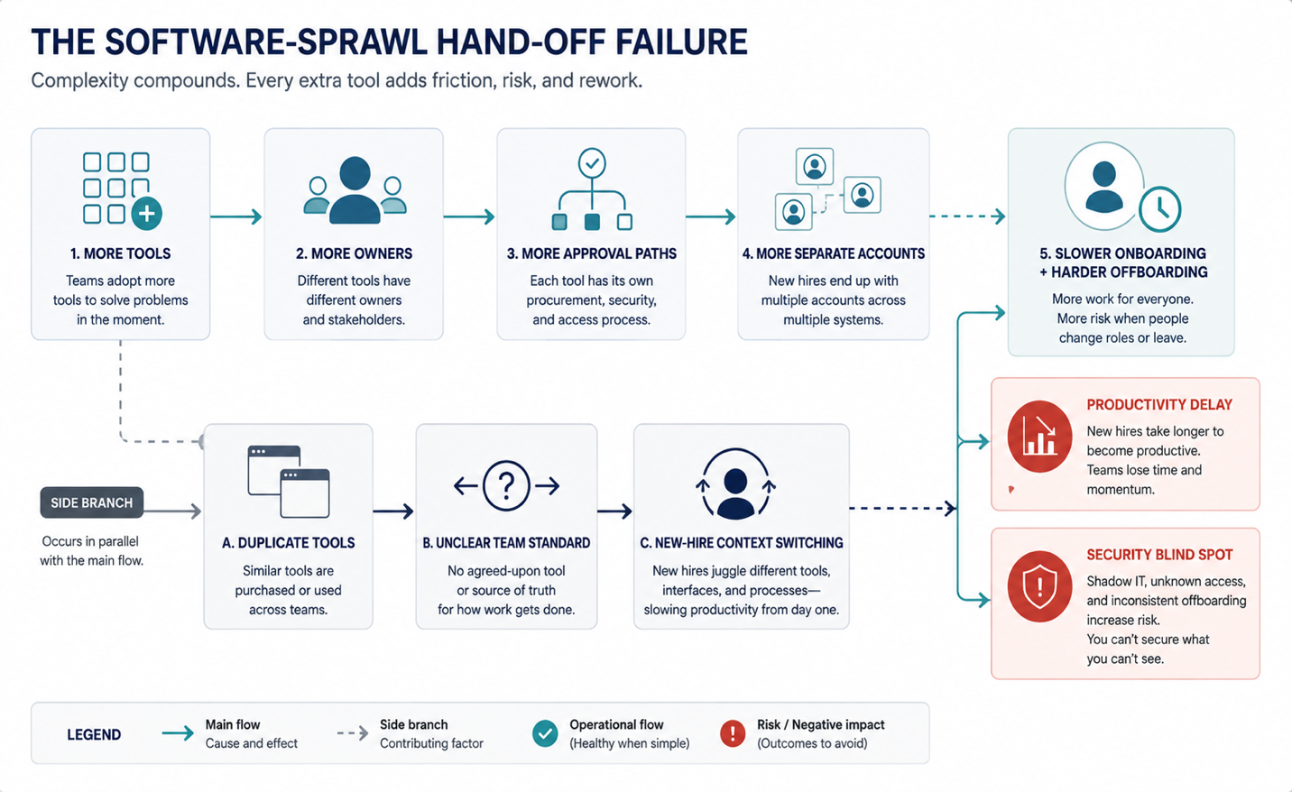
Having too many software tools may slow your employee onboarding. Each tool has a different owner, login method, permission level, and approval process and login method. That results in fragmented access, unnecessary licenses, and a high chance that there are active accounts for people who have already left your company.
It isn’t just another “tool fatigue” issue. It leads to multiple issues, each of which affects your new hire on their first day.
Width: 0px, Height: 0px
Width: 1292px, Height: 710px
Width: 1292px, Height: 710px
Width: 1292px, Height: 710px
Width: 1292px, Height: 710px
Width: 1292px, Height: 710px
Width: 1292px, Height: 710px
Width: 0px, Height: 0px
Width: 1292px, Height: 710px
Width: 1292px, Height: 710px
Width: 1292px, Height: 710px
» Duplicate Tools
Two teams are using completely different platforms for the same type of work. No one tells the new employee which is standard. So, they spend their first week in your company switching between tools, trying to find the right information.
» Unclear Ownership
The assumption game can also make your hire lose their productivity on the first day. HR assumes IT will provide them the necessary access. IT assumes the hiring manager will request it before they start work. The hiring manager assumes that HR will be handling the requests. As no one acts first, the access stays stalled. The person being onboarded has to seek help across the teams before they can gain access.
» Separate Identity Paths
Tools outside your single sign-on need separate invitations, passwords, and support requests when something goes wrong. Moreover, these accounts are easily overlooked when an employee leaves the company. So there would be more accounts, and creating new access may not be a priority.
» Copied Access
Giving your new employee the same access as someone in a similar role may seem efficient. But it will also carry forward outdated, overly broad, and unnecessary permissions. Nobody reviews them before offering access, which can become a problem later.
Each of these is a disadvantage of having too many software tools within the same organisation. Your hire will feel its impact on day one.
The solution isn’t to remove the excess tools just to clear the clutter. It is to reduce the number of ungoverned tools and confirm that every approved tool has a clear purpose, a defined owner, and an access process.
» Build the Access Map Before Automating
Automation cannot fix your problem if you haven’t mapped the existing software stack.
Before your HR and IT teams invest in an onboarding or workflow automation tool, they need a single shared source of truth: a Software Access Matrix.
This document would record which tools each role requires, minimum access requirements, who owns these tools, and how access can be granted/removed.
Width: 0px, Height: 0px
Width: 1292px, Height: 792px
Width: 1292px, Height: 792px
Width: 1292px, Height: 792px
Width: 1292px, Height: 792px
Width: 1292px, Height: 792px
Width: 0px, Height: 0px
Width: 1292px, Height: 792px
Width: 1292px, Height: 792px
Width: 1292px, Height: 792px
The matrix table for a clear understanding.
| Software or System | Who Needs It | Permission Level | Business Owner | Provisioning and Removal Method |
| Email, chat, and calendar | All employees | Standard user | IT/Operations | Created through an identity system. |
| Removed immediately at exit | ||||
| CRM | Sales and account teams | Role-based access | Revenue and Operations | Offered through the department. It is removed at offboarding |
| Design Platforms | Design and selected marketing roles | Viewer and editor | Design Lead | Access approved by manager |
| Project Management Tool | Relevant teams | Workspace or project access | Operations | Added through a role bundle. Removed immediately when no longer needed |
This matrix forces your teams to answer five questions before the start date of the new hire.
- Is the tool required for the specific role?
- What is the minimum permission level required to get the job started?
- Who approves an exception when someone needs additional access?
- Is this tool connected to single sign-on or needs separate handling?
- How and by whom will access be reviewed/removed later?
The employee software onboarding checklist tells your team what to set up. But the matrix explains why each access decision exists, who is accountable, and when it is no longer needed.
It turns your software overallocation from an operational issue to a governance one that your team can identify, assign, and fix.
› The Clean Hand-Off Model With Four Access Layers
Most onboarding frameworks cover the main tools. They often overlook smaller, unowned apps where access problems and security risks hide.
This simple approach will help organise every tool in your tech stack into four simple access layers.
» Layer 1: Core Identity
This layer includes email, single sign-on (SSO), multi-factor authentication, and a company password manager. Every employee should receive this layer by default, since it’s the baseline that lets them enter the company’s digital workspace securely.
» Layer 2: Work Foundation
Chats, calendars, shared documents, and project workspace occupy this layer. If you don’t standardise this by role or location, your new hire might hit their first blocker immediately.
The issue is rarely an unclear platform. It is usually a shared folder, team channel, or workspace that everyone assumes has been set up.
» Layer 3: Role-specific Systems
In this layer, you will find the CRM, GitHub, analytics platform, HRIS, finance systems, and other tools required to complete the particular job. Access comes from a predefined role bundle. For example, a sales representative needs access to CRM, sales enablement materials, and corresponding reporting dashboards. They don’t need systems used by revenue teams.
» Layer 4: Exceptions and Unmanaged Tools
All the legacy SaaS tools, personal account logins, browser extensions, and even external portals existing without a clear internal owner become a part of this layer. It is also the layer most employee software onboarding checklists overlook.
Your orphaned accounts and shadow IT quietly accumulate here. While layers 1 to 3 can be standardised and reused, layer 4 cannot be inherited similarly. Copying access from someone in a similar role will also duplicate unnecessary permissions accumulated over time.
› Apply Least Privilege
Use one principle across all four layers: least privilege.
Give people the smallest amount of access that helps them complete the job and make them request more only when the work genuinely requires it.
Documenting layer 4 will take more effort. But it is often the access that’s missed when someone leaves. It is also the first place where an auditor will look when reviewing account controls.
› The 7-day Protocol
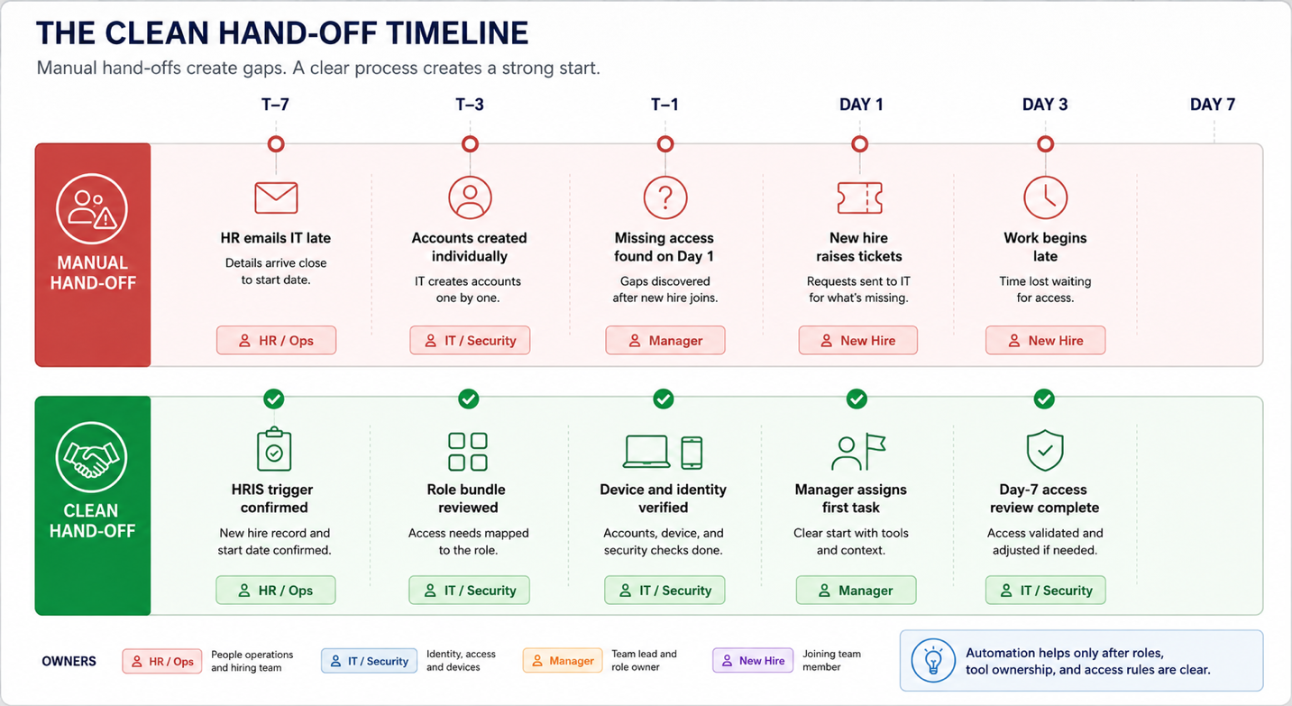
You don’t need more onboarding tools to fix these access delays. Create a clear timeline so HR, IT, operations and hiring managers know exactly what they own.
Width: 0px, Height: 0px
Width: 1292px, Height: 706px
Width: 1292px, Height: 706px
Width: 1292px, Height: 706px
Width: 0px, Height: 0px
Width: 1292px, Height: 706px
Width: 1292px, Height: 706px
Width: 1292px, Height: 706px
» Before New Employee Starts
At least five to seven days before the new hire’s start date, the HR and operations team should confirm their role, location, employment type, start date, and lead. IT and security can begin preparing the device, create the core identity, and assign baseline access.
Simultaneously, the hiring manager should confirm the employee’s role bundle and flag exceptions. Three to four days before the start date, the focus should be on setup and validation. IT configures SSO, MFA, core tools, and device protection while the manager checks that the employee has access to the correct team channels, role-specific systems, and project workspaces.
» One Day Before
A day before the start date, HR and operations should confirm the employee has received start instructions, while IT must test the device, identity, and critical login links. The hiring manager’s job is to determine the first task and confirm if every system needed to complete it is available.
Measure a clear day-one readiness signal instead of checking if accounts were created.
» Day One and the First Week
On the first day, HR or operations handles the welcome and escalation route. IT supports the new hire with their first login, MFA setup, and urgent access issues.
The hiring manager should be available to assign a real task. Orientation helps people understand the company. But it is the task that confirms whether they can actually work.
Between days three and five, collect feedback on blockers, document exceptions, and resolve missing permissions. By day seven, you can review the onboarding outcome. Remove unnecessary temporary permissions and confirm if the employee has the systems required to perform their role.
| Timeline | HR/Operations | IT/Security | Manager | Proof of Completion |
| Five to Seven Days Before Start Date | Confirm the role and employment details | Prepare device with core identity | Confirm the role bundle and exceptions | A completed hand-off form is submitted |
| Two to Four Days Before Start Date | Confirm the documents and employee details | Configure SSO, MFA, and other baseline tools | Validate the workspaces, channels, and role tools to be assigned | Review the access matrix |
| One Day Before Start Date | Send out instructions to the new hire | Test devices, login links, and identity | Confirm the first week's tasks to be assigned | Signal indicating day-one readiness |
| Day One | Welcome employee, provide escalation path | Support with login and privilege checks | Assign a meaningful task | Productive privilege check |
| Days Three to Five | Collect onboarding feedback from the hire | Resolve issues and log the exceptions | Confirm they completed the core work | Exception log is updated |
| Day Seven | Review the outcome of onboarding | Remove all temporary authorisations | Confirm final permission requirements | Access review is completed and finalised |
› Provisioned, Accessible and Activated
All three terms are generally treated as synonyms, but they are different. Provisioned means you have created the account. Accessible is when the employee can actually sign in.
Activated is when the new hire has the right workspace, permissions, context, and knowledge required to complete real work.
Most authorisation failures occur when “provisioned” is reported as done, but the new hire is somewhere between accessible and activated.
Track proof of completion, as it shows whether the first day of your new hire worked or not.
› One Source of Truth for Onboarding and Offboarding
Offboarding is connected to onboarding, but it is more urgent. Avoid treating it as an afterthought. You can use the same software access matrix used to prepare a new hire to guide the employee’s departure. It tells you which systems to review, who owns each application, and how rights should be removed.
› Disable SSO
Immediately after the employee leaves, disable their identity-provider account. It may not revoke access from every non-SSO application, OAuth connection, active session, API token, shared credential, or external portal. To maintain a reliable offboarding process, conduct separate checks for these exceptions.
› Record Evidence and Reclaim License
Reclaim the license once you remove access. Otherwise, unused seats will remain hidden when you renew the tools.
Keep the record simple. Find who approved access, who granted it, who reviewed it, and when it was removed.
A timestamped answer is more useful than vague assurance saying “IT handled it.”
› Track What Matters
The closed access request doesn’t mean your onboarding worked. It only indicates that someone from the team completed an admin task. What truly matters is whether the new employee can access the right systems, understand how work happens, and complete the task assigned to them without approvals.
Track these practical signals after each onboarding cycle.
- % of hires who can do a productive task on their day one
- The typical time it takes them to complete the assigned task
- Number of extra access requests the role needs in the first week itself.
These numbers show where your hand-off is breaking. It could be unclear ownership, an incomplete role bundle, or a tool that is outside the normal access process.
Monitor how many non-SSO tools your employees are using, how often access is removed within the first 30 days, and whether offboarding is completed within the specified timeframe. These will help identify hidden software access, missed accounts, and unnecessary permissions.
The purpose here is not to build another dashboard. It is about replacing assumptions with evidence and improving this outcome: how quickly and securely a new hire can begin doing their job.
› Conclusion
A clean software hand-off isn’t about giving new employees more tools on the first day itself. It is about giving them the fewest systems, permissions, and instructions needed to get started with real work securely.
Simplify your stack first, then automate the hand-off. Begin this journey with an access matrix, one accountable owner for every tool, and an honest measure of when you consider a new hire as productive.
If duplicate tools, unclear ownership, and disconnected systems are slowing your onboarding process down, start reviewing the software your teams rely on. Compare tools based on integration support, ownership, and access controls rather than feature lists.
› FAQs
1. How long should employee software onboarding take?
Ans. There is no universal timeline for software onboarding. What matters is measuring your own time to productive access, the time taken by the new hire from first login to first completed task. Measure it across a few onboarding cycles, and you will note where delays occur.
2. What is the difference between provisioning and activating it?
Ans. Provisioning means the account has been created. Activation lets the employee into the right workspace, permission level, and context, allowing them to use the systems. Most onboarding delays exist in this gap.
3. Do more software tools always create more onboarding friction?
Ans. Not always. The disadvantages of having too many software tools appear in unclear ownership, inconsistent access paths, and duplicate purposes. A well-governed twenty-tool stack can onboard employees faster than an ungoverned five-tool stack.